
Developing Black and White Film:
No Darkroom Needed
If you grew up prior to the new millennium, you will remember 1hr photo labs commonly found in Walmart and drugstores across the country. With the takeover of digital photography and the disappearance of photo processing labs, many people think that film photography has disappeared. Today, the difficulty and hassle associated with sending film away for processing should not be a factor in avoiding film photography; it is very simple to process yourself at home (at least with black and white film).
When I first got back into film photography, I took my film to one of a rare remaining local photo lab. I was initially afraid of making irreversible mistakes in the processing and losing the photos permanently. I was shooting in remote or far away locations, and the photos stored on these rolls of film were irreplaceable, and developing negatives can be a once shot kind of deal. The task of sending away photos for processing is time consuming and unrewarding (being a sucker for instant gratification), thus I decided that I needed to start developing my own film.
In the beginning I lost a few shots to loading errors, but after practicing with a few rolls of throw away photos, I quickly became proficient and have not completely lost a shot since. Every once and awhile I will get in a hurry and rush and slightly damage a frame, or get a bit sloppy with the processing and come out with some slight imperfections. All these minor errors, however, often lead to a bit of character for the shots, and remind me to slow down just a bit in the future.
In this article I will share with you, the simple process that I use to develop black and white film, the materials that I use, some tips and tricks that I have learned, and why you do not even need a darkroom to develop film.
No Darkroom Needed
The only time you need DARK is for loading the film. This part of the process only takes a few minutes and the rest of the development can take place anywhere! (preferably somewhere there is a sink).
Two ways to achieve darkness

Use a closet or other room with no windows. I have a closet with sliding doors located inside my windowless spare bathroom that provides double protection when I block the bathroom door light cracks and close the closet door. A broom closet, under-stairs-closet, or anything of that sort could work as well. To block the light to the bathroom door cracks, I picked up a single panel blackout curtain designed for a large window on sale at a home goods store for around $20. I hung this over the bathroom door, and then use a black towel to lay over the top of the curtain rod where there is a gap. The same results could probably be achieved just by using black duct tape and towels around the door cracks! Also, if there are windows in the room, you could use cardboard, trash bags and duct tape as an acceptable solution. The ideal situation is a dual purpose space where light can easily and quickly be blocked when needed.

Changing bag. These can be purchased on Amazon or other photo supply sites for around $20. This is a double zippered dark bag with hand holes where you put the film and tank in, zip it up, stick your hands into the darkness of the bag and load the film. I have not used one of these as they seem cumbersome, but I have many friends who swear by them, and they are a great alternative if you do not have a suitable dark space.
Developing Materials
The list below includes only the most basic components needed. I use stock Iflord chemicals that are already liquid and require simple dilution. If you search the web you will run across an overwhelming amount of opinions and options regarding chemicals and process variations. At first, I let this scare me. As such, I started with the most basic chemicals and process thinking I would later have to move on to a more complicated method. This turned out to be false, you can get fantastic results from the simple process I will describe below.
$6
Exposed Roll of Film
This is the fun part, go out and shoot!
$30
Developing Tank
I was initially taught using a metal developing tank with metal spirals. The thought behind this is that the metal supplies will last longer and are easier to dry between uses. However, I found them to be extremely more difficult to load and shortly switched to a plastic tank with plastic reels.
$15
Thermometer
Nothing fancy is required here. I initially attempted a cheap digital cooking thermometer, which broke after about 5 uses and then went with a standard metal dial thermometer that costs around $15 which has worked well with no issues.
$0
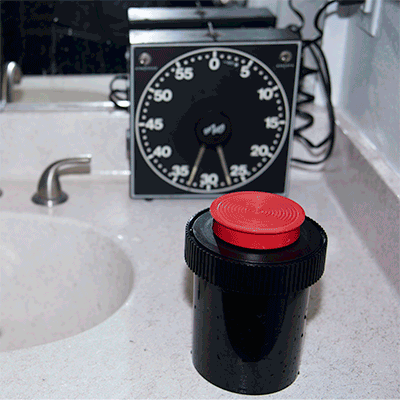
Timer
For processing film, I simply use the timer function on my cellphone. Once the film is in the developing tank, you can work in room light, so the cellphone timer works great. Because I also have a darkroom set up for printing, sometimes I also run my darkroom timer while I’m processing, but this is completely unnecessary.
$15
$0-1
Graduated Cylinder
Water
$10
Does 6 rolls
Developer
Ifosol 3
This is needed for mixing/diluting the processing chemicals. I bought mine from a photo supply store; however, just to be sure the plastic wouldn’t react with the photo chemicals, I use an 1000ml size. However, this isn't that important because I put the chemicals into empty gallon water jugs after measuring so I can mix up enough or as little as I will need for my processing batch.
I mostly use tap water for my processing. Some people swear that using distilled water is the only way to go, and others completely use tap water. I use a mix of both. I try to mix my developer chemical and do a final wash with distilled water. Also having the empty jugs around comes in very handy.
I use Ilfosol 3 black and white film developer. Many people prefer Kodak Dektol developer, which comes as a powder and requires a bit more complex mixing process. From what I hear, it ends up being a bit cheaper and is of better quality; but I stick with Ilfosol because it is so simple to use. I never reuse developer when developing the film, unlike printing on paper where the developer can last one or two sessions worth of printing.
$8
Does ~24 rolls
Stop Bath
Ilford Stop Bath
$10
Does ~ 8 rolls
Fixer
Ilford Rapid Fixer
Similar to the developer, it comes in a liquid and requires a simple dilution. It smells kind of funny and some claim in might ‘stain’ the film. You can use a water/vinegar mix, or even plain water instead of a chemical stop bath. This is the only chemical that I reuse from roll to roll so it is cost effective and due to its dilution ratio, it lasts a long time.
Once again, I use the Ilford product. This has the largest amount of chemical per part water of the three and thus requires more frequent purchasing. Because I develop a lot of film, I buy it in a 5 liter jug for $35, which has a cost savings of $3 per liter. If I am developing a roll of valuable photos, i.e. from travel or family portraits, I don't reuse fixer from roll to roll. But, if I am developing shots from camera tests or goofing around, I will reuse the fixer for two or three rolls.
$5
Clothes Pins
Some clothes pins, clips, or other hanging devices to hang the film up to dry. One for attaching to a line, or in my case shower rod, and one to weight the other end of the film down so it doesn't flop around
Total Costs:
One Time Costs: ~$100
Cost per roll developed at home: ~$4.00
Cost at my local film lab: $7.50
Mail order 120 roll film development: ~$8 -$11
At a cost savings of only $3.50 per roll, you have to develop 28.5 rolls of film before making up for the one time overhead cost and actually save money processing your own film--is it really worth it? If you are into seeing instant results, like seeing the film photography process from start to finish, want to explore creative control aspects of processing, and like to re-live the days of high school science lab, then ABSOLUTELY! But ,if you have the patience to wait for the film to be processed and sent back, expect perfection out of every single roll, and don’t like getting your hands dirty (smelly), or don’t own a sink or faucet, then having a professional process the film for you is probably the way to go.
The Process:
Total Time: ~ 35 mins for the first roll and 25 minutes for every subsequent roll during the same session due to the chemicals already being mixed.
Mixing Chemicals:
10 mins
I grab some jugs of distilled water, or fill up an empty jug with tap water and measure the temperature. I mix and match cold or hot water until the thermometer reads 20°C/ 68°F. If you do this enough you will get to where you can pretty much accurately gauge water temperature with your hand. Once I have my water supply ready, I get out three empty jugs that I have previously labeled D, S, and F, which I rinse and reuse after every session. I take out my graduated cylinder and measure out the chemicals and water as per the label on the container.
CHEMICAL
RATIO
NOTES
Developer
1+9
Stop Bath
1+19
Fixer
1+4
Pour the ifosol to the 100 mark and then pour in the water until the level reaches the 1000 mark. Then pour the mixture from the graduated cylinder into the jug labeled D.
Rinse the graduated cylinder and then pour stop in to the 50 mark and fill with water up to the 1000 mark, and pour into jug S.
Rinse the graduated cylinder and then pour fixer in to the 200 mark and fill with water up to the 1000 mark, and pour into jug F.
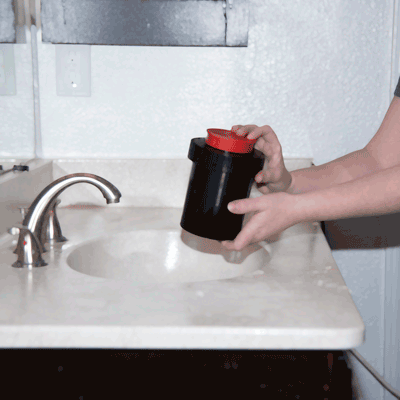
Loading the Film:
5 mins
The first step in the development process is to get the exposed roll of film safely into the developing tank in complete darkness. Consider wasting a roll of the cheapest film to use for practice loading in the daylight. Plastic reels are so easy to use, watching a YouTube video or two may be enough that you can go into the dark and load your first roll with no practice. Metal reels are so difficult to load; I wasted a roll and practiced over and over and over again, before going into the dark for the first time. There was no take-up spool on my first medium format camera, so I had to waste a roll to get the spool, and thus a practice roll was born. First, practice assembling your tank in the light and then practice assembling it in the dark with no film a few times to catch any weak points or errors. Also, carefully place the items in a familiar an organized fashion so you can easily find them in the dark. It is a terrible feeling to drop a spool or reel and be stumbling around in the dark hoping to find it.


Start unrolling the paper, and carefully feel for the start of the film. There won't be a photo in the first few inches of the film, so it's ok to touch it here. Once you've found the start of the film you can separate it from the paper and place it onto the reel. (unlike this photo, have the reel ready to go before turning off the lights!)
Use your thumbs to feel for the longer edge of the reel guide and lay film squarely across the ledge, if the film is crooked or not aligned with the reel edges it will hang up and cause problems as you start to ratchet it onto the reel. As you slip the film into the leader you will feel the ball bearings grip the film. Try to avoid touching the areas of film where photos will be, any grease or dirt on your hands will cause problems during the development process.
After the film is securely through the leader and you can feel the ball bearings grip and the leading edge of the film is on the other side, you can start to ratchet the film onto the reel. The first time I did this I worried I would put the film in upside down wrong side facing out; do not worry about this, the film is curled from being on its spool and it will naturally want to go onto the reel in the same direction with the shiny side outward.

Ratchet smoothly and don't force the film if you start to feel resistance. Practice taking the reel apart and putting it back together in the dark before loading your first reel. Every once and awhile the film will jam up and you need to carefully twist the reel apart, release the film, put the reel back together, and start the process over. Once you have the film almost all the way on, you will get to the end where it is taped to the paper.

The paper easily pulls away from the tape, so I remove this first and toss the paper and spool aside. Then I more carefully use my finger nails to peel the tape away from the film. The last inch or two of the film does not have a photo so it's ok to touch. An easier solution is to just cut the film with scissors just past the tape.

Ratchet the remaining portion of the film all the way on to the reel, and you are ready to assemble the tank.
R

Place the spool through the hole in the reel. The wider end of the spool goes on the bottom when placing the spool into the tank. The little plasic spool is the lightest, smallest part of the assembly so I always place it in a known location prior to turning out the lights and reach for it carefully because it can easily be knocked and bounce away as you are waving your hands around in the dark trying to find it.

Place the reel and spool into the tank and close the lid tightly. Always make sure the rubber seal is on the tank prior to securing the lid or your chemicals will leak out when you agitate. As you tighten the lid to the tank be careful to make sure it is threading properly.

Now your tank is ready to go. You can turn on the lights and start developing. The tank is light tight, when you pour in the liquid it has to turn several corners to reach the reel. The small lid on top is to prevent spillage when agitating the tank, it does not play a role in light blocking.
Quick rundown to how film works: tiny silver (Ag) crystals are embedded in the film, when exposed to light, they react, but a chemical is needed to finish this reaction which turns the silver particles that saw light into visible silver on the film. The developer is what reacts with the silver emulsion on the film. On exposed film, areas of low to no light will react very little, and areas of high amounts of light will turn silver (black) creating the negative picture on the frame. This is the part of the process where you are actually bringing the picture to life.
Note on timing: When I first started, I was unsure of when to pour the liquid in and out during the timing process. Some people say start pouring on the dot and pour out right when the timer runs out. Some say pour on the dot and pour out 10 secs early etc. I don’t think it really matters as long as you do it the same way every time, so I pour 10 secs early and pour out when the timer finishes every single time; but, it doesn’t matter how you chose to pour in and out as long as you remain consistent your results will as well.
So, after the film is safely loaded on the reel and the tank lid secured, the lights can come on! I go to the sink and get out my cellphone with timer and some good tunes and start the timer for 30 seconds longer than the development time. When the timer gets to 10 seconds prior, I start pouring the developer into the tank. Once the liquid level reaches the top, I replace the lid and start to agitate. I agitate, meaning flip the container upside down and right side up with a slight twisting motion repeatedly for 30 seconds. Then I set the tank down, tapping it firmly on the counter or sink to move any bubbles to the top. Now I watch the clock and once every minute I repeat the agitation process for approximately 10 seconds. When the timer runs out, I pour the developer liquid down the drain.
Developer:
4-7 mins

Stop bath does exactly what it sounds like, it stops the development process; if left in the developer too long, the silver would react giving you a very very dark negative resulting in a very very light positive. The developer has an alkali type composition, so to stop the development reaction, an acid type stop bath is used, neutralizing the alkali composition of the developer and rendering it inert. This process only takes a few moments, so the time needed in stop bath is short. The Ilford instructions say 10 seconds, so what I do is pour in, swish around a bit to ensure there is an even coating, wait 10 seconds or so and use a funnel to pour the stop back into the S jug. For me the stop probably spends about 30 seconds touching the film, which seems to work just fine.
Stop Bath:
10-30 sec


Fixer:
2-5 mins
Once the chemical reaction of the developer has stopped, the negative photo should be developed and hopefully is as dark, light, or properly exposed as you were hoping for when you took the shot. However, we still need to complete a cleanup step called Fixer. The dark areas of the negative (light areas of the photo when inverted by printing or scanning) are comprised of silver crystals, but the light areas of the negative (areas that were not exposed to lots of light when shooting the scene, i.e. shadows) still contain silver particles that didn’t react to the developer. If left there, these silver particles will actually start to tarnish like silverware in a real silver dining set. To preserve the film from tarnishing, we use Fixer which chemically grabs the non-reacted silver particles and washes them away. Iflord recommends 2-5 minutes using their rapid fixer, so I split the difference and use it for 3.5 minutes. I do the same procedure as with the developer and agitate for the first 30 seconds and then for 10 seconds every minute after, tapping the tank on the counter each time to remove bubbles. This is the only chemical that you should not pour down the drain, because it contains actual silver particles, it is bad for the water supply. I pour the used fixer into empty jugs labelled as such and take them to my local photo development lab in mass every six months or so, when I go to buy film or get color film developed. They develop so much film that they actually spend the time to reclaim the silver from the fixer and sell it. If you don’t have a local photo lab, well I guess pour it out somewhere, just don’t tell the EPA!

10 mins
Wash and Rinse
10 mins
The negatives are now completely safe to be exposed to light, so you can remove the lid of the tank to wash. I fill the tank up with water and dump it completely out three or four times before setting the tank under the faucet to run. If you live in an area where water is scarce, you can just fill and dump 10 or so times, agitating the tank for about a minute each time. This uses probably less than a tenth of the water that I use by continuously running the faucet over the tank. It is also important that the temperature of the wash water be close to that of the developer, I usually just use my hands to feel for the approximate temp. After 8 or 9 minutes I pour the last of the tap water out and pour distilled water into the tank, I swish the reel around in the distilled water for about a minute then take the reel out and give it a couple curt vigorous shakes to expel the excess water on the film. Many people use an additional step in the washing process called a wetting agent; this is designed to help prevent bubbles and streaks during drying. I tried this for a bit, but found it to be an unnecessary step for me and that the final rinse with distilled water, did the best job. However, with that said, my film is far from pristine.
1-2 hours
Hang to Dry:
After the washing I take the reel apart and hang the film off of clothes pins attached to the shower curtain rod above my bath tub. I stick another clothes pin at the bottom of the strip of film to keep it from flopping around. The ideal location for drying is a temperature-controlled dust free area… but my slightly dusty bathroom works just fine for my purposes.

Note on drying: Usually I just walk away from my drying film and come back several hours later when its perfectly dry and ready to be cut, scanned, and filed away. However, the first time I was in the room with the drying film, I noticed that after about 10 to 20 mins it started to look weird; like it had a sticky substance coating it, and it started to warp in strange ways. This is a normal part of the drying process, which I did not realize, so I started touching it and messing with it trying to wipe it off and keep it from warping… I ended up messing up that roll of film by bothering it during the drying process. If you see it looking bad while its drying, ignore it and leave it alone, this is normal and it will look shiny and nice once its fully dry!